Showing posts with label tutorial. Show all posts

Monday, June 8, 2015

In My Studio: Instagram 2.0


Recently our very own Hudson Valley Etsy started an Instagram account. I wrote a blog post introducing our new account and how to get started with your own Instagram account (click this link to view the original blog post)

When writing it I realized I had only touched on the tip of the iceberg and there was so much more to discuss. In this follow-up blog I hope to give some more tips and suggestions on how to get the most out of this uber popular social media platform.

To curate the best possible Instagram feed, create a cohesive look. By making sure your photos are of great quality and similar themes it will encourage people to follow you when they look at your profile. 

Think carefully about your posts content, don't be too "salesy." Bring your followers closer to you by showing them behind the scenes photos, your techniques and tips, your studio and inspiration and most importantly your personality.


Mira's Naturals have great continuity in their Instagram feed

Apps and Programs to enhance your feed:

1) If you generally do most of your craft business on a PC or laptop it is still possible to post to your Instagram feed without using your device. Download Gramblr a free program enabling you to select photos from your desktop and download them straight to your feed.

2) Also a useful program for your PC or laptop is Fotor. In this free program it is possible to manipulate, edit or collage your photos. Alternatively from your device you can use the Overgram app to add text to your pictures or Pic Stitch to make a collages and add frames.


Collage I put together using Fotor


3) To help understand your audience look at Iconosquare. This is a free service to keep track of your statistics, who follows/ unfollows you, which of your posts is the most liked, comments on your posts and successful hashtags


Iconosquare summary of the Hudson Valley Etsys Most Liked Instagram Posts

A bit about Hashtaging:

Using hashtags in Instagram as a way to help you grow your business is really important. The right hashtags will help you get more likes, followers and comments. Hashtags dramatically increase the reach of your post which means more Instagram followers. Hashtags can also help you find people on Instagram with similar businesses, interests as you.

When deciding which hashtags to use after a post the simpler the better and try to be specific. Hashtag what your product is, its color, who its for, where it is for sale, where it was make- anything that will foster interest.  Here are afew good generic ones:

#etsy
#handmade
#shopsmall
#crafts
and of course if you are a member of the Hudson Valley Etsy don't forget:
#makersonhudson
#hudsonvalleyetsy


Linking with your other social media platforms:

Don't forget to share your instagram posts across your other social media accounts. It is very easy to link Instagram with your business facebook page, twitter, tumblr, flickr and foursquare.

1) From instagram go to your profile page (the person icon at the bottom)
2) Click the gears icon at the top of the page.
3) Scroll down to settings and click on 'Linked Accounts'
4) There should be a list of different social media platforms. Tap on the one you want to link.

For example linking to your facebook page: After tapping on the facebook link it will say Share to. Tap on this and the pages you manage will pop up. Mark the correct page.

5) Next time you post on instagram the last page will have all the social media platforms listed. Tap on the ones you want to share your post with before you tap the 'share' icon.


For a reminder here are all the team instagrams:

Elena Rosenburg is  @elena_knitsandbits
Pulp Sushi is @pulpsushi
The Pudgy Rabbit is @thepudgyrabbit
Quarter Life Luck is @quarterlifeluck
So Handmade is @sohandmade1
Hudson Naturals is @4crispycorncakes
Melissa Anna Designs is @madcat03
Cynla is @cynlastudio
Twisted Thread and Hook is @twistedtah
Beyond the Picket Fence is @beyondthepicketfence
Lollypups is @lollypupspetwear
Hesters Studio is @hesterkeith79
Charms of Faith is @Jackie_charmsoffaith
Karmabee is @karmabeekaren
Miras Naturals is @mirasnaturals
Pve Shop is @pvedesign
Pergamena NY is @pergamenany
Harp & Thistle is @harpandthistlestitchery

Good Luck and Good making!

Sarah

SO Handmade

Monday, February 24, 2014

A New Year, A New Project

As a creator of mosaics, I am drawn to the patterns and colors of china and pottery. In my studio, there are stacks of plates, bowls, and teacups, that are waiting to be incorporated into a mosaic. There are also several bins full of leftover shards from the pieces of dishes that didn’t make it into a mosaic. 


Recently, I have been experimenting with utilizing leftover shards to make shard pendants, with a soldered edging.  

To learn the process, I purchased a book called Simple Soldered Jewelry & Accessories, written by Lisa Bluhm.  This book gives instructions on tools and supplies that are needed, and provides easy to follow visual instructions on the process of soldering.


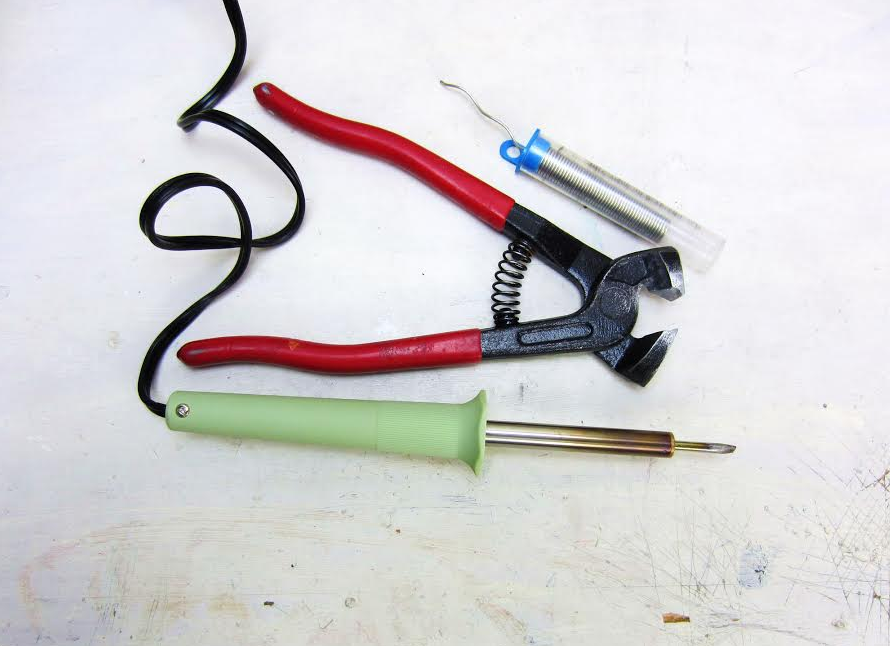
I bought the most essential supplies first, to give myself time to decide if this is a project that I wanted to pursue.  I purchased a soldering kit from Michaels, which included a soldering iron, a roll of copper foil, and a container of solder.
My most used tool, a tile nipper is what I used to cut a particular design out of a dish, or to even out the sharp edges of an existing china shard.


Copper foil, which has one sticky side, is wrapped around the edges of the shard, pressed down, and smoothed. Then using the soldering iron, solder is melted over the foil, and pulled around the front, side and back edges, with the tip of the soldering iron; sort of like painting with the solder.  The copper foil should be covered completely with solder.  A jump ring is soldered in place.


There is so much more to learn about different metals, melting temperatures, and materials  that can be used.  Now, I am ready to purchase more supplies and tools, and with more practice, I may be able to refine, and perfect my technique.

Monday, July 8, 2013

DIY Leaf Pincushion Pins

 Leaf Pincushion Pins Tutorial

For all you crafters who sew, or know someone who sews, here's a little way to green up your pincushions!

Materials:

Sculpey
x-acto blade or even a toothpick will do
foil
flat top pins or needles from the dollar store


Choose or make various shades of green by mixing the ready made colors with white or clear sculpey.  Just knead the two shades together until blended.  Roll into a tube, and cut some slices.


Make a leaf shape of a slice by rolling it into a ball, flattening it, and pinching one end.  Push in the pin or needle, and push the clay back onto the puncture so it's sealed.  Its nice to have decorative pin heads that are flat, as they are easier on the fingers and okay to iron over.


Gently press the x-acto blade or toothpick onto the top of the sculpey to make the veins of the leaf.


I got some leather punch tools to press into my sculpey pins as well!


 Place or even make the pins right on top of a small piece aluminum foil.  That way you don't even have to move them after you've formed them, which usually distorts their sides.  Bake at 275 degrees for 10 minutes and they are done!  So simple and fun!

Easter Egg by Vanessa of the Pudgy Rabbit
The Garden Party Tortoise goes on his way to new projects


Jody
www.astudiobythesea.etsy.com

Wednesday, April 24, 2013

DIY: Matting & Framing Art


DIY: Matting & Framing My Fantasy Art
Part 3

Tools and Materials

DIY metal frame 
Picture hanging wire (any wire will do, even tough string)
screwdriver
duster
matted artwork
plexiglass
wire cutter
Plexiglass

This is the final part of the tutorial.  Previously I had completed the matting of the art, and now I assemble the frame and put the artwork in it.  I buy my frames from American Frame, Graphic Dimensions, and sometimes from the art suppliers like Dick Blick, Pearl Paint, or AI Friedman.  I like American Frame because most of the time I'm framing artwork for conventions and I expect the art will do some traveling before it sells, so I prefer metal frames for toughness. I use plexiglass, which American Frame will cut for you as well, instead of glass because it is much lighter, and may crack but not shatter as glass will.  I like color in my mats but a clean, austere look in my frames.  


I assemble the frame as per the instructions, leaving the top open for insertion of the art.


I insert the corners at the top and the piece for hanging wire about 5" down.


I dust off the top of the matted artwork so there is no lint.  The plexiglass comes with sticky paper on both sides. I peel off one side and place it quickly on the matted art so there is minimal chance of getting dust on that side.  Then I peel off the other side, revealing the artwork.  I scan for lint and specks.  If I find anything, I carefully lift the plexiglass and use a bit of masking tape on a finger to trap the lint and remove it.


 Now I'm ready to slip the matted artwork and plexiglass in together into the 3 sided frame.


And slip in the final top side of the frame.


I turn the whole piece over and screw the sections in tight.


I don't know the technical name for these curvy things, but they apply pressure between the frame and the backing board to keep the art in place.  Slip them in along the edges, about 4 or 5 to a side.


They don't fit in all the way, and they occasionally pot out, but they do the job.


 Cut a length of wire about 4" longer than the width of the frame and put them through the holes of the frame's wire hangers.  Wrap the ends around the wire.


Finished and ready for show!


Jody

www.astudiobythesea.com
www.jodylee.org

[Etsy+avatar.jpg]

Monday, March 25, 2013

DIY: Matting & Framing Art Part 2


DIY: Matting & Framing Art
Part 2


Acid free glue
Acid free mounting tape
Weights (stray books)
Ruler

In Part 1 I removed the art from the illustration board and measured and cut my mats.  Using acid free glue in all four corners, I glue the two colored mats together.


I make sure the sides of the window of the mat line up evenly, and then weight the corners down with a few stray paperbacks to make sure the mats adhere to each other as they dry.  By the way, I was framing 3 different paintings at this time, so the art and colors of mat board do change in the demonstration pictures.


Place the backing board right up to the top of the mat, top/surface/showing side facing down and use masking tape to keep it in place.  Cut two or more acid free tapes to act as hinges and glue in place.  These too may need a book weight on them to keep them in place until they dry.


When dry, remove the masking tape, and fold down the hinged double mat over the backing board.  3 finished mats, ready for use!


Lift the mat and insert the artwork.


 If there are vertical and/or horizontal lines in the artwork, use a ruler to make sure they are parallel to the lines of the mat.  Gently shift the art around and make sure no outside edges appear - the mat completely covers the art on all sides.


Tape the art in place with masking tape, carefully keeping the art in place with one hand.


Flip open the mat.  With more acid free hinges, tape or glue the artwork in place at the top of the painting.  Art and paper breathes and expands, especially depending on how much moisture there is in the air.  So I attach the art only from the top so it doesn't wrinkle from being caught on the bottom.


And again, weight the hinges as they dry, 15 minutes to a half hour.


Remove the masking tape, fold back over the double mat, and the matting part of this tutorial is finished!


Part 3 will cover framing.


Jody

www.astudiobythesea.com
www.jodylee.org

[Etsy+avatar.jpg]

Monday, March 4, 2013

DIY: Matting & Framing Your Art


DIY: Matting & Framing Your Art
Part 1

Tools, Material and  Equipment 

mat knife or x-acto blade
large tube 
mat cutter with straight and bevel cutters
long straight rule 30"-36"
acid free mat board
acid free backing board or foamcore
superfine sandpaper
art on paper board

When I decide to show my art at an art show, I do most of my own matting and framing to save on costs and to present my work in the manner I prefer.  I was taught the basics of this skill in a Printmaking class in art college and it really does come in handy.  It isn't very hard but it is time consuming, so this DIY is in three parts.  Since I do most of my art on illustration board, this means removing the acid free surface layer that the image sits on from the heavy backing board.  I cut a slit along one edge with an x-acto blade and begin carefully pulling the top white layer away from the backing board.


 Once I get enough of a lip going, I use an old mailing tube to begin rolling up the top layer.  This is done by holding the paper tightly to the tube and separating the two layers very slowly and carefully, checking all the time that I'm not ripping through the image.


The top image layer may tend to curl after this, and I just slip it under some heavy boards for a few days  until it flattens out.


I choose to double mat my art, and I look for board colors that will enhance and complement the artwork.  Because this art had a brown and ivory center with a black border, surrounded by blue gray stone flowers, I thought a brown and beige mat with a black frame would suit it best.  I use Bainbridge Alphamat and an acid free foamcore board for the new backing board.  The acid in normal, everyday papers cause it to yellow, become brittle and decay in a few years so that is why we want to avoid using anything that isn't acid free or 100% Rag.


 I measure the art, leaving 1/4" to be covered by the mat, while the "arms" of the mat will be 3 3/4" wide.  You can choose what ever width you like, but the larger the art, the greater the width should be.  I usually do 4" or more, but I think this artwork had some odd dimensions for framing.  Note that I don't talk about the width of the opening.  I find it easier to deal with consistent small numbers measured from the outside edges.


I cut all three boards (Brown mat, Beige mat, Backing board) to the dimensions of the framed art, which I decide will be 26"x30".  I have a Logan mat cutter that is 25 years old and still going strong, and I use it for all my mats and boards.  Like they say in carpentry, measure twice, cut once.  Acid free mat boards are expensive and you don't want to mess one up.  I usually do my cutting on a table in the basement but I needed more room and more light since I was photographing the process.  So I laid out some towels on my dining table and put the mat cutter on them.  This protected the table and all the items laid out on it.


The Logan comes with two cutters: a straight edge cutter and the bevel mat cutter.  Both run on the silver track for straight, perfect cuts.


This is how I mark my boards:  the lowest mark is the straight cut line for the outside size of the mat, while the straight  horizontal line is for the horizontal mat cut and the tiny vertical line just above it marks the end of that cut and the start of the vertical mat cut.  The lowest layer is going to be beige, and each arm will be 3 3/4" wide.  The picture below is of the brown mat that will go on top of the beige, and so needs to be a thinner width so the beige will show through.  The brown layer's arms will only be 3 3/8" wide.  The two mats should not have the same size of "arms" or the same size opening.


I slip the 30/32" x 40" board beneath the straight edge arm of the mat cutter.


Making a straight edge cut to reduce the board down to 26" x 30".


Now for cutting the mat openings, I change to the bevel mat cutter and place the mat on the cutting board so that the long pencil lines of the horizontal cuts are visible to me.  Line up the cutting arm with the small vertical marks.  My version of the Logan mat cutter needs a scrap board inserted below the mat or the mat blade will cut into the pressboard surface of the mat cutter itself.  So I save my 30" or 40" pieces of mat board that I just cut off to use for that.


 Begin and end by lining up the bevel cutter with the long horizontal pencil lines.  You see there are two lines?  Well, I measured incorrectly the first time, but caught my mistake when I checked it.  This is why I need only two long horizontal pencil lines - so I can see when my blade cutter lines up with my markings at the top of the cut, and the bottom of the cut.  When I cut along the pencil lines I will use the vertical cuts I made as marks as where to begin and end.


When your blade gets dull, change it!  This is what happens - the cut doesn't go all the way through and  one gets a ragged edge.  I gently sand off this rough edge with super fine sandpaper.  I was framing 3 pieces of art at this time, so the mat below was for another painting.


[Etsy+avatar.jpg]
Send feedback