Showing posts with label how-to. Show all posts

Thursday, March 27, 2014

Fooling Around with Fiber - An Adventure in the Wet Felting Process

Today we have a guest post from team member Kathryn Luciana of Huzzah Handmade sharing with us her recent visit to White Barn Farm and Fiber.

White Barn Farm Shop

Spring was barely in the air when I returned to White Barn Sheep and Wool near New Paltz, N.Y.  I'd visited this lovely shop and farm last year and signed up for a couple of lectures, but this time, I was there to immerse myself in a process called Wet Felting. I have always been intrigued by this process, and although I've been knitting and felting my work for years, Wet Felting is very different, and I wanted to learn more about it.

Paula Kucera, owner of the farm, welcomed us to her studio and shop, which is housed in part of the white barn for which the farm is named. The shop is cozy, very well stocked with a wonderful variety of fiber, books, tools, and a nice selection of local handmade items. Featured is a good selection of locally sourced fibers in addition to her own luscious yarns from her herd of mostly Cormo sheep. She recently remodeled the "knit lounge" and the workshop area of the barn, so we had lots of light and space to work. She described the process, showed us various examples of finished pieces, books about wet felting, and described the materials that we would  be using.
Merino wool batts, and coils of roving

Very simply stated, Wet Felting is a process by which various fibers are arranged on a fiber background creating a design. Then the substrate and fibers are covered, and warm, soapy water is gradually poured over the piece. By rubbing gently with your hands, and adding water as necessary, gradually the fibers start to meld, but that's just the beginning! Several more steps and several more hours later, you have your finished piece.

In preparation for the day, Paula suggested that we find something to inspire our project, like a photograph, scrap of fabric, an image or anything we might find helpful as a jumping off point. I decided to choose one of my photographs. I found several that I thought might work, and manipulated them in Photoshop to make them more abstract. I took four or five with me, but finally ended up with one from part of my garden.
My batt and my inspiration photos

Paula was kind to us. She chose 100% Merino 19 micron wool, because of it's ability to felt more easily then other fibers. A great choice for newbies. The "canvas" on which we worked is called a batt. We had chosen our batt colors in advance, and Paula had a nice variety available when we arrived. The batts are basically soft, rectangular sheets of wool, and since we were going to be making purses or tablet carriers, the color of the batt would become the inside of the bag. I chose gray/brown, but more adventurous students chose lime green or turquoise. Other than that, our tools were humble: a towel, plastic bubble wrap, synthetic organza fabric, a plastic sheet, rubber stair tread material, a scrap of non-slip rug material, and a piece of a foam "noodle" like kids use in the pool.


Our tools
The "paint" we used on our "canvas" was Merino wool roving in an amazing variety of colors,  yarn, and various other fibers. We set about pulling off sections from the roving coils to create our designs. With my photograph nearby, I started creating my scene. As well as the wisps of roving, I also used a couple of colors of merino yarn for texture. Once our bag front was complete, we flipped the whole piece over and repeated the process for the back and flap. (Notice the piece of plastic inside the bag to keep the back and front from felting together). With step one, the bag front and back completed, we moved on to step two. Time to get wet! If you like getting messy, you'll love this process.


Step One, complete
Step Two is where the magic starts to happen. The front of the bag is covered with a scrap of organza fabric. Then, warm, soapy water is dribbled over the fabric gradually. It needs to get really wet. Squishy wet. As you add water, you start to gently rub the fibers with your hands, eventually covering the entire piece. This abrasion will start the felting process. Rub, add water, rub, check your progress by lifting the fabric. Finally, the fibers will be adhered to themselves and to the batt, so that you can lift the organza and flip the piece over to repeat the process on the back. I wanted to make a messenger style bag with a cross body strap, so I had an additional step. I selected a length of roving, allowing for shrinking, and using the rubber stair tread, I rolled the wet roving back and forth on it until it felted into a solid tube. As I worked on the bag back, I attached the strap to the inside, felting it as I rubbed the outside of the bag. The side seams are turned under and felted closed securely. After that, time for a quick lunch and a trip to see the sheep down at the barn.


Recently sheared Cormo Sheep

Organza fabric layer
Back to work, we now started the labor-intensive part of the process. Our pieces were sandwiched between two sheets of plastic, and one piece still remained inside. We placed our work on the bubble wrap, rolled them around our foam noodle, and tied the ends tightly. On top of our towels, we started rolling the package back and forth on the table, 50 times one way, then flip the package around and 50 times the other way. There is a stance one must assume to do this, and you quickly learn the meaning of the phrase "put your back into it." Using our forearms, we rolled and flipped and rolled and flipped. Paula assured us that it would only take and hour or so! I soon realized that I didn't have to worry about working off the calories I ate at lunch.
Every couple of hundred rolls, we had the chance to peek at the progress of our work. They were getting smaller and denser, little by little. Finally, we were ready to move on, but we were not done yet! 


Checking the progress
Rolling, rolling, rolling!

After deciding that our pieces were sufficiently felted, Paula led us to the sink, where we scrubbed them vigorously in a basin of hot water. After wringing out most of the water, we then got to use our rubber mats. Now, at this point, if you have any aggression to release, go for it. We grabbed our bags and threw them down on the mats repeatedly to finish the process. Wham! We were done!! Our bags were felted, but there was still opportunity for further experimentation. I took my bag home and threw it in the dryer on hot, so that it felted even more, and the strap was then the perfect length. My bag ended up being about and inch or two larger than an iPad, all around. I will add a lining and a closure. Other students were considering adding needle felted decorations, beads, leather handles or other adornments.

Hot water "shock"
Throwing down!


So, after 5 hours, lots of elbow grease, and three cups of Yogi Energy Tea, I have a small insight into the ancient process of Wet Felting. It was a great day, in good company with a patient teacher. A very satisfying experience.  White Barn Farm and Fiber Shop is located at 815 Albany Post Road, New Paltz, N.Y. You can visit Paula on the web at: whitebarnsheepandwool.com


My bag, with felting completed


Story and Photos by Kathryn Luciana of Huzzah Handmade

Tuesday, December 24, 2013

Time To Wrap it up!

With the December holidays and New Year's Eve, there are lots of gifts to give. With the gifts come a lot of wrapping.  As retailers, we know presentation is the key.  You can make the simplest thing sparkle. I like to use gift packaging as a time to use what I already have.
via MarthaStewart.com
Original Artwork

  One of my favorite choices for wrapping are my kids drawings. A stick figure dinosaur with a santa hat -- who can beat that!  I have rolls of drawing paper for the kids to draw on endlessly.  I can find the best patterns and story lines to give people and my kids have fun doing it.  I also like to use watercolors and make my own artwork to wrap up a special gift.
via  Poppytalk
Scrap Fabric or Clothes

Not all shrunken or destroyed, worn out clothes make good rags, some may make great wrapping.  Also scrap fabrics are great for bows and decorations. Over at Poppytalk they show a great tutorial on making a printed fabric for tying up your gift.

via Grey Likes Weddings
You can cut up that moth eaten sweater and sew a gift cozy! At Grey Likes Weddings they show you a reuse of a sweater for a wine cozy. A great way to use the sleeves of your worn out knits.
 A great alternative for those who are not stitchers would be the Japanese Furoshiki wrapping method. It involves tying knots to secure the package in a beautiful way.  Uniqlo has a lovely video on Furoshiki wrapping.
via How About Orange
Simple Everyday Materials

If you look around there is always something you can find -- from newspaper, kraft paper, cardboard, containers -- that with a little paint, thread, yarn, stamping, hole punching, and cutting can become the perfect presentation for your gift.  It's almost a gift on its own.

There's a great tutorial on creating a bow from magazines with newspaper wrapping at How About Orange.


Reuse, Create and Give!
Happy Holidays!

Karen - Lark Practical

Monday, October 21, 2013

DIY Tutorial: Shadow Box Halloween Decoration

Looking for a unique Halloween decoration? A shadow box is a great way to create your own dimensional Halloween art. Using just layers of paper, you can create a spooky, ethereal scene, great for tabletop or window decor. The same idea can be used for any holiday theme!

Materials:
1. Paper or card stock. I used white card stock, black card stock, silver paper, white and red vellum, and dark blue paper for the background.
2. Shadow box frame.
3. Scissors or X-acto knife with #11 blades.
4. Self-healing mat or cardboard to cut on.
5. Ruler for cutting straight lines.
6. Tape and white glue.

To create your design, you need to plan out how many layers of paper you will use. You can draw your own design, find a design template, or cut out collage images to use. For my shadow box I drew a ghostly image of a mysterious woman amongst the trees. I drew the design on one piece of paper, and marked which parts will go on which layer. I used two layers of trees, the cloaked woman, a background layer, and some separate pieces of vellum to create an effect of mist.

Open your shadow box and measure the inside of the frame. This is the size of your image, but leave some extra room on top and bottom to create a folded flap that you can tape or glue to the sides of the frame. Cut out each layer, leaving a flap on each one. You will cut the flaps down to fit into the box, depending on where your layer sits. You can use an x-acto knife or scissors, making small, slow cuts with a sharp blade. Vellum is usually easier to cut with scissors, but a sharp blade will also work.

I attached the white tree layer first, and added the woman behind them, attaching her to the bottom. The silver trees were spaced behind her. Behind the trees, I added a piece of vellum on the bottom. For the background layer, I attached it to the top of the frame, and left some space open at the bottom to let light in. I cut spaces out of the paper and glued a vellum moon and some more layers of mist onto it. Use a toothpick to apply small amounts of regular white glue, or attach small bits of double sided tape. The vellum adds a nice glow when placed near any light source, and I left the back of the frame open to let the light in. You can protect the back of the frame with a piece of clear acetate or Plexiglas.

The effect this creates is of a mysterious, misty forest, using only paper, light, and the depth of the shadow box. The design options are endless to make your own art and dioramas. You can experiment with different papers and vellum, and also add in 3 dimensional objects. Have fun and a Happy Halloween!

Arwen from Arwen Designs

Wednesday, September 25, 2013

How To Plan Your Own Craft Fair

Today we have a guest post from one of the co-leaders of the team, Jess from Knot by Gran'ma who is currently planning not one but TWO local craft fairs in the Hudson Valley.

This year I have been pretty fortunate to start wearing another hat in the fine arts and craft fair (and even non-arts) world. My opportunity to organize shows and events seems to be snowballing into something that is just about a part time job. Needless to say, I drink quite a bit of coffee these days.

I’m sure there are books out there for putting together arts and craft shows, but I’ve been learning as I go. It’s been a wonderful learning experience and is also helping my business grow. I’m able to connect more with other artists and shoppers, and see what other people are looking for in craft shows. There’s opportunities to network at every step of the process. I get to implement others’ “show wish list” into a fair. As an artists, I remember shows that were set up with both the artists and buyers in mind, so getting that information as feedback from everyone is really important to throwing a great show.

Growing your contacts list for a show is also a wonderful tool in putting together an art or craft fair. Your show will only be as strong as your vendors. If you have top notch artisans selling their pieces, you will draw in happy buyers. I’ve been using an email newsletter list that artists and other types of vendors can sign up for. This enables me to easily let everyone know that I have a show coming up in the future and am looking for vendors whenever an opportunity may arise. I like to keep this separate from a buyers’ list, which I use my own business lists , which I use to let my buyers know about shows.

The hardest part (for me) is the PR end of things. I tend to have no budget (which hopefully won’t be an issue in the near future). The trick is finding places you can get your show’s call for vendors and actual show date up and available to the public. This is also a great list to grow… places to add your press releases, flyers, or event to calendars. It’s imperative that people can find you to sell and to shop. Here’s an example of the flyer for the next show that I have in planning. All of the information for both groups is included on this particular flyer. I like to use these kinds of flyers for online posting and getting into public places that give you permission to hang them.

In the meanwhile, you’ll find yourself making list after list after list of things to do, contacting your vendors, setting up spaces, and pulling all of the information together. You want to know exactly what you’re going to do on the day of the show, keeping your stress minimal. This was all very overwhelming at first, but now that I’ve got a few shows under my belt, I feel more confident with each one I do. It’s also over before you know it, and you can go home to relax.

Jess from Knot by Gran'ma 

Tuesday, January 29, 2013

Tutorial: Candle Holder Vellum Heart Decoration

Here is a tutorial to decorate any glass candle holder with paper! A great, inexpensive way to create candle holders to fit any occasion. This design is a simple, elegant Valentine theme, using vellum and cut paper.  
Materials:
1. Paper. I used white vellum, red vellum, and black paper. The translucent vellum is what diffuses the light and creates a nice glow. Black or dark paper will give you a nice crisp silhouette against the light, a light colored or thinner paper will give you a more muted look.
2. Clear Glass candle holder.
3. X-acto knife with #11 blades, or small scissors.
4. Self-healing mat or cardboard to cut on.
5. Ruler for cutting straight lines.
6. Double sided tape or glue.
7. Votive candle or battery operated tea light.

You can refer to my tutorial for Cut Paper Silhouettes for ideas on finding a design and transferring it to paper: Paper Cutting Tutorial   Measure the height of your candle holder, and cut a strip of vellum to wrap all the way around it. Size your design to fit within this space. My heart design has the main heart image in front, and swirls that partially wrap around the side. You can choose a design or pattern that wraps all the way around also.   Transfer your design onto the paper. Cut the design out with your x-acto knife, on your self-healing mat. Make slow, small cuts, and make sure your blade is sharp.  

  Once your main design is cut out, you can add other colors. I added red to the center of the heart by tracing the space cut out of the heart onto red vellum. Make the shape slightly larger than the opening you are tracing so that it will overlap. Then I cut out the red vellum heart, and attached it to the back of the black paper. Vellum is harder to cut shapes out of, it helps if you hold the paper down close to where you are cutting so it doesn’t tear. You can also try small scissors.   Attach the colored vellum to the back of the paper with double-sided tape or small amounts of glue. Attach the whole design to the long strip of vellum with double-sided tape or glue. Tape is better than most glue because it will be a little more flexible when you bend it around the glass. You can also use a spray adhesive. Wrap the vellum around the candle holder and secure at the back with tape. Light a candle inside, turn down the lights, and enjoy! You can use a regular candle with this since the paper is on the outside, just make sure the paper doesn’t go higher than the glass, and never leave a burning candle unattended.  
  Extra Tip: To remove wax from a used glass candle holder, use boiling water. Make sure the glass is not too cold to start with (or it could crack), place it in an aluminum pie plate to catch any water or wax, and fill the glass with the boiling water. Let it sit for a while and the wax will melt and float to the surface. Pour some boiling water down the outside also to melt it away.

Arwen ~ Arwen Designs

Monday, January 21, 2013

Keeping Track Of Etsy Expenses With Outright


For a few years I've been devoted to my many Excel spreadsheets to keep track of money coming in and going out of my business.  Without fail, I always miss SOMETHING and I'm scrambling come tax time.   I tried software programs like Quicken and I just couldn't get it right.  I thought I was stuck with my 15 spreadsheet system until I learned about Outright.com and wanted to share this treasure with everyone.
Outright is all about helping small businesses succeed. They know that a lot of us dread dealing with the books so they're here to help.  Outright is a super easy application to setup and nothing needs to be installed in to your computer.  You just plug in your info and you'll be linked to all of your business accounts.  You'll soon be keeping track of all your Etsy sales, shipping costs, fees, coupon deductions and more.


I got a head start on prepping my expense reports and was able to generate reports based on Etsy Transaction fees, Etsy Renew fees, Search Ads, supplies purchased, PayPal fees and much more.  I can't tell you how excited I was to see everything so neatly on paper!

The best part about all of this is that it's FREE! No kidding! They also offer Outright Plus at $9.95 per month and get additional features but so far I think I'm doing fine with what's available free but the additional perks may benefits those with a 'bigger' small business.  Outright is a godsend and definitely worth trying out.

If you can make it down to Brooklyn, an expert from Outright will be leading a workshop at Etsy headquarters on Tuesday January 29th: The Lowdown on Taxes for Etsy Sellers

Monday, December 17, 2012

The Ever-Cool Gel Image Transfer Technique: A Tutorial.


Hi! I'm Jill from Entropic Grace, an artist in Cold Spring, NY. About a year ago, my husband Mike and I were taking a walk along the banks of the Hudson River in town when we spotted some absolutely stunning pieces of driftwood. Perfectly smoothed, they were just breathtaking. So we picked them up. Then we spotted more, and picked those up, too. And so on, and on...

Being artists, naturally we were thrilled with these found treasures, and we happily piled them into our car. Once at our house, the driftwood remained in our shed for, umm, a while, until my husband came up with the divinely-inspired idea of transferring images from old photographs onto some of the pieces using the tried and true method of Gel Medium transfer. We fell in love with the results, and so I have decided to share this time-honored method of image transfer in this tutorial. Enjoy.

Gather Your Materials. You will need some really cool pieces of wood and the means to cut it if necessary. Your supply list includes: laser prints of the images you want to transfer, sandpaper, brushes, an old rag or tee shirt, a tape measure, straight-edge, gel medium, Mod-Podge, white latex paint, scissors, and an old credit card. And some hot coffee and good music help, too.

Check out the instructions after the jump


 Arrange your laser printed copy of the photo or illustration you plan to use.
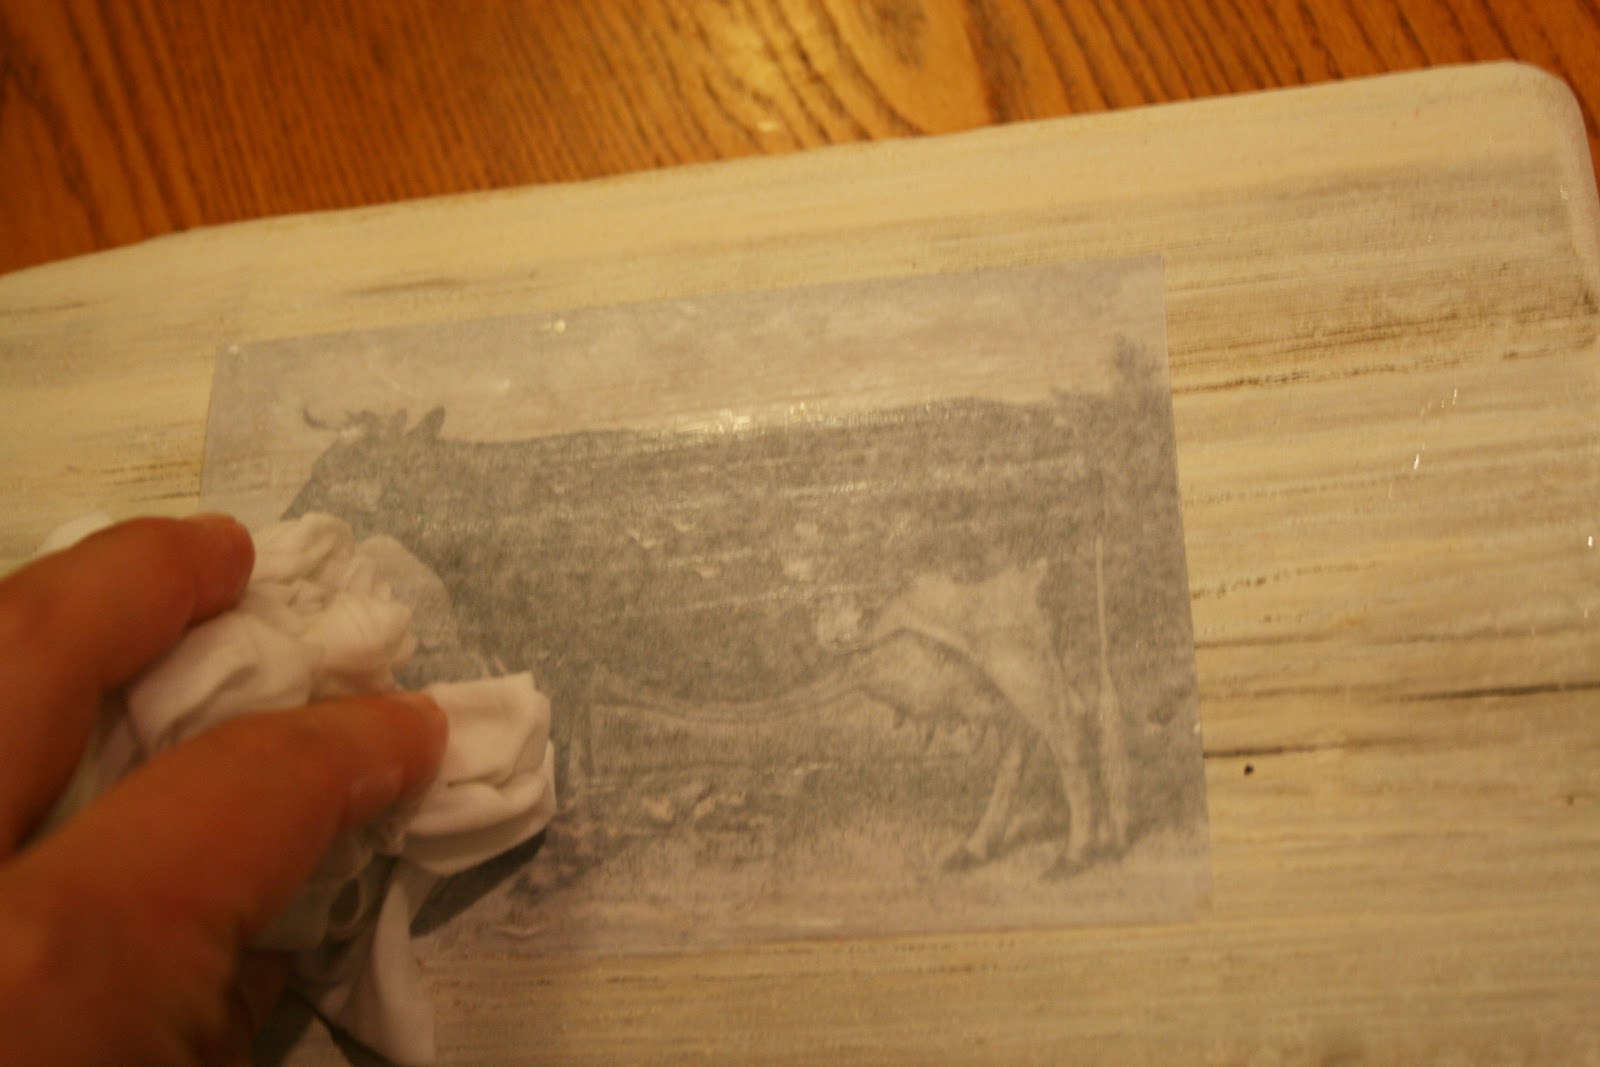
Here, I used an old cow print from a livestock catalog, which I found at an antiques store, and one of my own illustrations. But you can use anything: old family pictures or kids' drawings would be great.
Make sure to reverse the copy if you don't want it to transfer backwards. 


Position and arrange your prints as desired.
Measure, cut, and sand the wood.


Paint the wood. If you want a white-washed look, 
rub the paint out with an old rag, allowing the grain to show.


Brush the acrylic gel medium on your prints.
Place the coated print face down on the wood piece and position it as desired.
Use an old credit card to gently remove any trapped air.
Let the pieces dry for 24 hours. This will be the hardest part!

Wet a tea towel or other soft cloth and lay it over the wood piece to saturate the image with water.
Make sure your image is good and damp. Then, gently rub away the paper fibers.

Rub the fibers away, dipping your fingers into water as you go.
Be patient, and make sure all the fibers come away from the images.
    
   Coat the wood with Mod-Podge, and let it dry.


And finally, enjoy your new creations, or give them as handmade gifts. 

Thursday, November 8, 2012

Craft DIY: 6 Pointed Snowflake Tutorial

Today we have a great tutorial from Arwen from Arwen Designs - who specializes in making greeting cards using paper cut art.  Hope you enjoy it!

Making cut paper snowflakes is a fun winter activity, and a great craft that kids and adults alike will enjoy. They look great lining your window as holiday decorations, or even framed on your wall. Part of the fun is seeing how they will come out. Just like real snowflakes, no two are ever quite the same! Here is a tutorial for making a 6 pointed snowflake, which looks more natural because that is how snowflakes are actually formed.


Materials:

1. Paper. The paper I used is regular white 8.5” x 11” printer paper, which is cost effective and readily available. You can also try all sorts of colorful papers, including scrapbook papers and even gift wrap. Thin papers will be easier to cut through with scissors.

2. Scissors. I used regular household scissors, with a fairly sharp blade. Scissors with a very small sharp blade, like nail scissors, would enable more delicate cuts.   Take the sheet of paper and fold it over to make a triangle (A). Cut off the excess. This basically makes it a square, if you are starting off with a square sheet, you can just fold it over. Now fold it over again to make a smaller triangle (B).


Re-open the fold you just made, and now comes the tricky part. You have to fold it into thirds so it looks like (C). Fold over onto itself from the left and right sides, using the middle fold line as sort of a guideline. The three sections should be as even as you can get them. Now fold this whole piece in half, so it looks like (D).

Take your scissors and cut the top off at an angle so it looks like (E). The angle can vary, it just has to cut off all uneven edges.

Now you are ready to cut out your design (F)! The bottom point will be the center of the snowflake. You will want to cut away a lot of the paper, and not leave any areas too thick or the snowflake will look blocky. The last photo shows how this design looks unfolded. As you experiment, you will get used to how the cuts will look when the snowflake is opened, and where you want to cut away more and less paper.

There are many creative ways to use your designs. One way I’ve used them is to integrate snowflakes into my cut paper art. I scan them into the computer along with my artwork, and work with them in Photoshop. Here is an example: http://www.artistrising.com/products/612278/Winter-Love.htm

So when the snow starts falling outside, grab some paper and scissors, and have fun!